Medical Disclaimer
  • For Educational Purposes Only: This content is intended for educational reference and should not be used for clinical decision-making.
  • Not a Substitute for Professional Judgment: Always consult your local protocols, institutional guidelines, and supervising physicians.
  • Verify Before Acting: Users are responsible for verifying information through authoritative sources before any clinical application.
AI Assistance Notice
The clinical content and references are curated and reviewed by myself; however, AI was used to assist in organizing, paraphrasing, and formatting the information presented.
Bedside Snapshot
Goal
Secure the airway to allow controlled oxygenation and ventilation when bag-valve-mask (BVM) or non-invasive support are inadequate or unsafe.
Key Indications
  • Failure to oxygenate/ventilate
  • Inability to protect airway (GCS ≤ 8)
  • Predicted deterioration (burns, edema, anaphylaxis)
Approach
Always plan for Plan A (primary intubation), Plan B (supraglottic airway), and Plan C (surgical airway). Use checklist and team huddle.
Safety Anchors
  • Optimize preoxygenation & positioning
  • Limit attempts (≤ 20-30 sec, typically ≤ 2 attempts)
  • Confirm with waveform capnography
  • Secure tube and reassess after every move
What is Endotracheal Intubation?

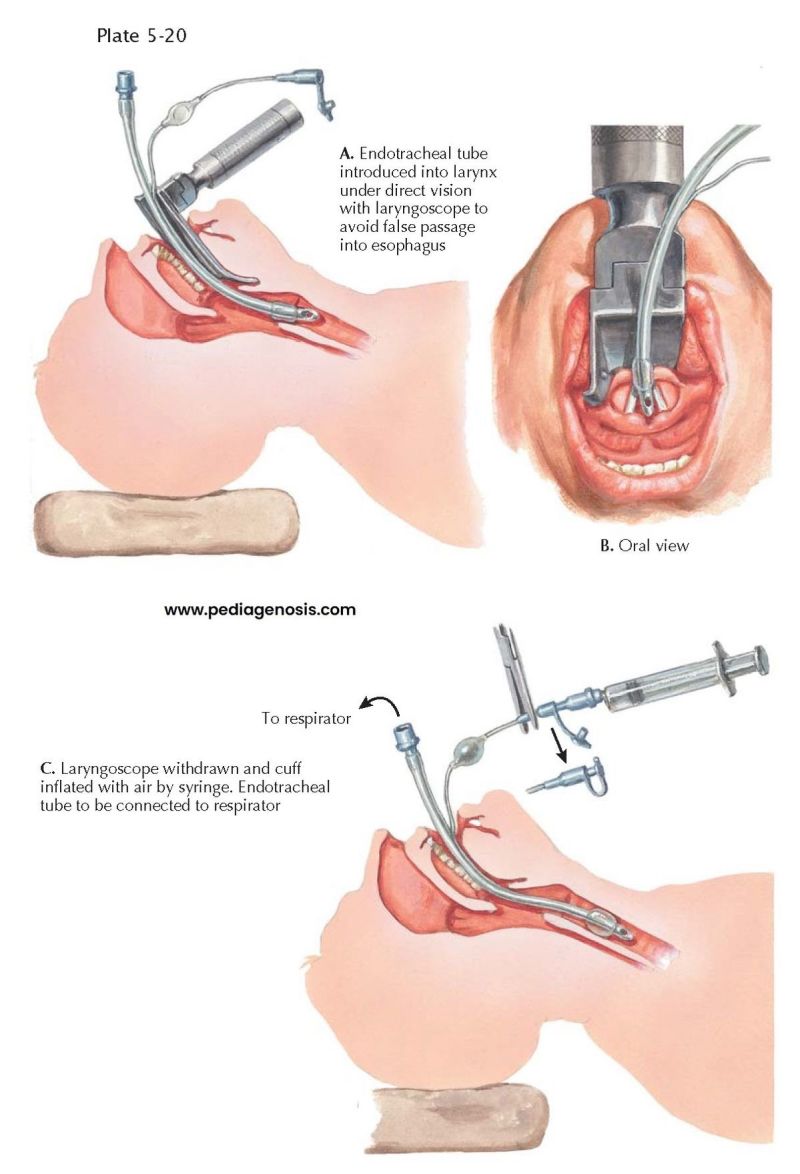
Endotracheal intubation (ETI) is the placement of a flexible plastic tube (endotracheal tube or ETT) into the trachea through the mouth or nose to establish and maintain a patent airway. This advanced airway procedure is one of the most critical interventions in emergency medicine, critical care, and anesthesia.

Purpose and Function

Endotracheal intubation serves multiple vital functions:

  • Airway Protection: Prevents aspiration of gastric contents, blood, or secretions into the lungs by isolating the trachea from the esophagus with an inflated cuff
  • Controlled Ventilation: Allows precise delivery of oxygen and controlled mechanical ventilation, ensuring adequate gas exchange even when spontaneous breathing is inadequate
  • Direct Airway Access: Provides a secure route for medication administration (though IV route is preferred) and suctioning of secretions from the bronchial tree
  • Facilitates Positive Pressure Ventilation: Enables delivery of positive end-expiratory pressure (PEEP) and other advanced ventilatory strategies
Endotracheal intubation overview showing airway anatomy and tube placement
Endotracheal intubation: securing the airway with direct visualization and tube placement through the vocal cords into the trachea

When It's Necessary

Endotracheal intubation becomes necessary when less invasive airway management techniques are insufficient or contraindicated. Common scenarios include:

  • Respiratory failure (hypoxemic or hypercarbic) unresponsive to non-invasive ventilation
  • Decreased level of consciousness with inability to protect the airway (typically GCS ≤ 8)
  • Anticipated clinical deterioration (e.g., airway burns, angioedema, progressive shock)
  • Need for prolonged mechanical ventilation
  • Facilitation of surgical procedures requiring general anesthesia
  • Cardiac or respiratory arrest requiring advanced life support
The decision to intubate should be based on clinical trajectory, not just a single vital sign or lab value. Consider the patient's ability to protect their airway, work of breathing, adequacy of oxygenation/ventilation, and predicted clinical course over the next few hours.
Endotracheal intubation is not without risks. Complications can include hypoxemia during the procedure, hemodynamic instability, aspiration, dental trauma, esophageal intubation, and even cardiac arrest. Every intubation must be approached with meticulous preparation, a backup plan, and continuous monitoring.
Indications & When to Consider Alternatives

Common ED/ICU/Prehospital Indications

Failure to maintain or protect the airway:

  • Glasgow Coma Scale (GCS) ≤ 8 or rapidly declining mental status
  • Persistent vomiting with inability to protect airway
  • Facial trauma compromising airway patency
  • Status epilepticus with ongoing seizures

Respiratory failure:

  • Hypoxemic failure: PaO₂ < 60 mmHg despite supplemental oxygen or non-invasive support
  • Hypercarbic failure: pH < 7.20 and/or PaCO₂ > 55 mmHg with clinical deterioration
  • Severe work of breathing with impending fatigue or exhaustion

Trauma indications:

  • Severe traumatic brain injury (TBI) requiring controlled ventilation and airway protection
  • Major trauma with decreased consciousness or airway compromise
  • Anticipated airway obstruction from neck or chest trauma

Medical emergencies:

  • Severe status asthmaticus or COPD exacerbation with exhaustion or impending arrest
  • Cardiogenic pulmonary edema failing non-invasive ventilation
  • Septic shock with progressive respiratory failure and altered mental status
  • Anaphylaxis with impending airway obstruction

Anticipated clinical course with high risk:

  • Inhalational or circumferential neck/chest burns
  • Angioedema or epiglottitis with progressive airway swelling
  • Massive hemoptysis or GI bleeding with risk of aspiration

When to Consider Alternatives First

  • Non-invasive ventilation (NIV), high-flow nasal cannula (HFNC), or bag-valve-mask can safely bridge the patient to recovery or definitive care
  • Local resources or provider experience for emergency intubation are limited
  • The patient is awake and cooperative with spontaneous breathing efforts that can be supported
  • Attempted intubation could be catastrophic if it fails and no immediate rescue options exist (no supraglottic airway, no surgical airway capability, no skilled backup)

There are few absolute contraindications to intubation when it's truly indicated, but be cautious with:

  • Suspected epiglottitis or upper airway obstruction: May worsen with manipulation; consider awake fiberoptic intubation or immediate surgical airway preparation
  • Severe coagulopathy or anticoagulation: Increased bleeding risk; prepare for potential complications
  • Unstable c-spine without immobilization: Risk of spinal cord injury; maintain inline stabilization
  • DNI (Do Not Intubate) orders: Respect patient wishes; ensure goals of care discussions are clear
Airway Assessment

Systematic airway assessment helps identify potential difficulties before the first laryngoscopy attempt. Use both structured scoring systems and clinical gestalt to predict structural difficulty ("Can I get the tube in?") and physiologic difficulty ("Can they tolerate the attempt?").

LEMON Assessment - Structural Difficulty

LEMON airway assessment mnemonic
LEMON mnemonic for predicting difficult laryngoscopy
Swipe to see more
Component What to Assess Concerning Findings
Look Externally Facial appearance, anatomy Facial trauma, large tongue, beard, missing teeth, obesity, limited mouth opening, prominent incisors
Evaluate 3-3-2 Anatomic measurements < 3 fingerbreadths mouth opening
< 3 FB mentum to hyoid
< 2 FB hyoid to thyroid notch
Mallampati Oropharyngeal view (when possible) Class III-IV (only soft palate visible, or soft palate not visible)
Obstruction Airway patency Tumor, hematoma, abscess, foreign body, angioedema, epiglottitis
Neck Mobility Cervical spine movement C-collar, ankylosing spondylitis, spinal fusion, pain/guarding, rheumatoid arthritis

HEAVEN Assessment - Additional Risk Factors

HEAVEN complements LEMON by identifying factors that increase procedural risk:

  • Hypoxemia: SpO₂ < 93% before laryngoscopy (shorter safe apnea time)
  • Extremes of size: Pediatrics ≤ 8 years old, morbid obesity (BMI > 40)
  • Anatomic challenges: Trauma, swelling, mass, distorted anatomy, blood/vomit
  • Vomit/Blood/Fluid: Active bleeding, secretions, gastric contents in airway
  • Exsanguination/Anemia: Low hemoglobin means smaller oxygen reserve
  • Neck mobility issues: Collar, halo, arthritis, trauma precautions

Physiologic Difficulty - "Can They Tolerate It?"

Assess the patient's physiologic reserve and ability to tolerate apnea during intubation:

  • Baseline oxygenation: Current SpO₂, FiO₂ requirement, degree of hypoxemia
  • Ventilation status: EtCO₂, respiratory rate, work of breathing, accessory muscle use
  • Hemodynamics: Blood pressure, heart rate, signs of shock, tissue perfusion (lactate if available)
  • Metabolic state: Severe acidosis (DKA, lactic acidosis) reduces apnea tolerance
  • Safe apnea time estimate: Obese, pregnant, critically ill patients may desaturate in 1-2 minutes vs. healthy patients tolerating 8+ minutes

Recognize these patients as extremely high-risk for peri-intubation complications:

  • Severe ARDS: Require high PEEP; loss of PEEP during laryngoscopy can cause profound hypoxemia
  • Right heart failure: Loss of preload or increase in afterload during intubation can precipitate cardiovascular collapse
  • Profound shock: Sedatives and paralytics can unmask severe hypovolemia or distributive shock
  • Severe metabolic acidosis: Loss of respiratory compensation during apnea worsens acidosis rapidly

Consider awake intubation, delayed sequence intubation (DSI), or other modified approaches for these patients.
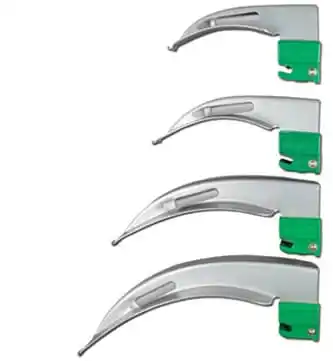
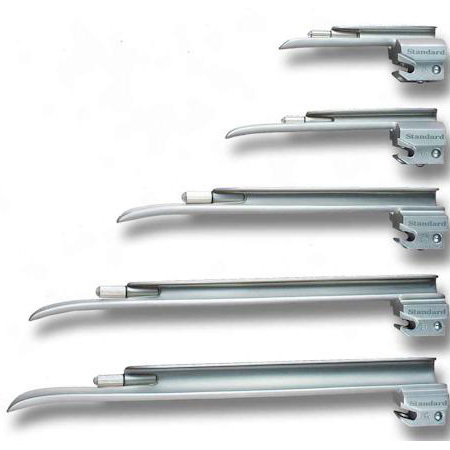
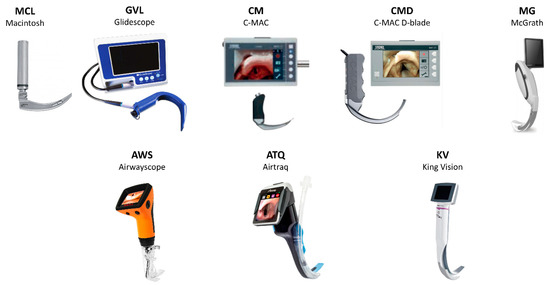
Equipment & Preparation

Core Airway Equipment

Endotracheal Tubes (ETT)

Endotracheal tube anatomy
Different sizes of endotracheal tubes
Endotracheal tubes in various sizes
  • Standard cuffed tubes for adults: Size 7.0-7.5 mm ID for most females, 7.5-8.5 mm ID for most males
  • Tube sizing: Based on internal diameter (ID) in millimeters
  • Pre-procedure check: Test cuff integrity by inflating before use; lubricate tip with water-soluble gel
  • Depth guide: 21-23 cm at the teeth for average adults (females typically 21 cm, males 23 cm)
  • Radiographic confirmation: Tip should be 4-5 cm above the carina (approximately T3-T4 level)
  • Specialty tubes: Reinforced (armored) tubes for prone positioning, double-lumen tubes for lung isolation

Laryngoscope Blades

Macintosh curved laryngoscope blades
Macintosh (curved) laryngoscope blades
Miller straight laryngoscope blade
Miller (straight) laryngoscope blade
Swipe to see more
Blade Type Technique Sizes Best Used For
Macintosh (Curved) Sits in vallecula, indirectly lifts epiglottis by lifting hyoepiglottic ligament 3 (standard adult), 4 (large adult) Most adult intubations; larger mouth opening
Miller (Straight) Directly lifts the epiglottis by placing blade tip posterior to it 2 (small adult), 3 (standard adult) Anterior larynx, pediatrics, floppy epiglottis
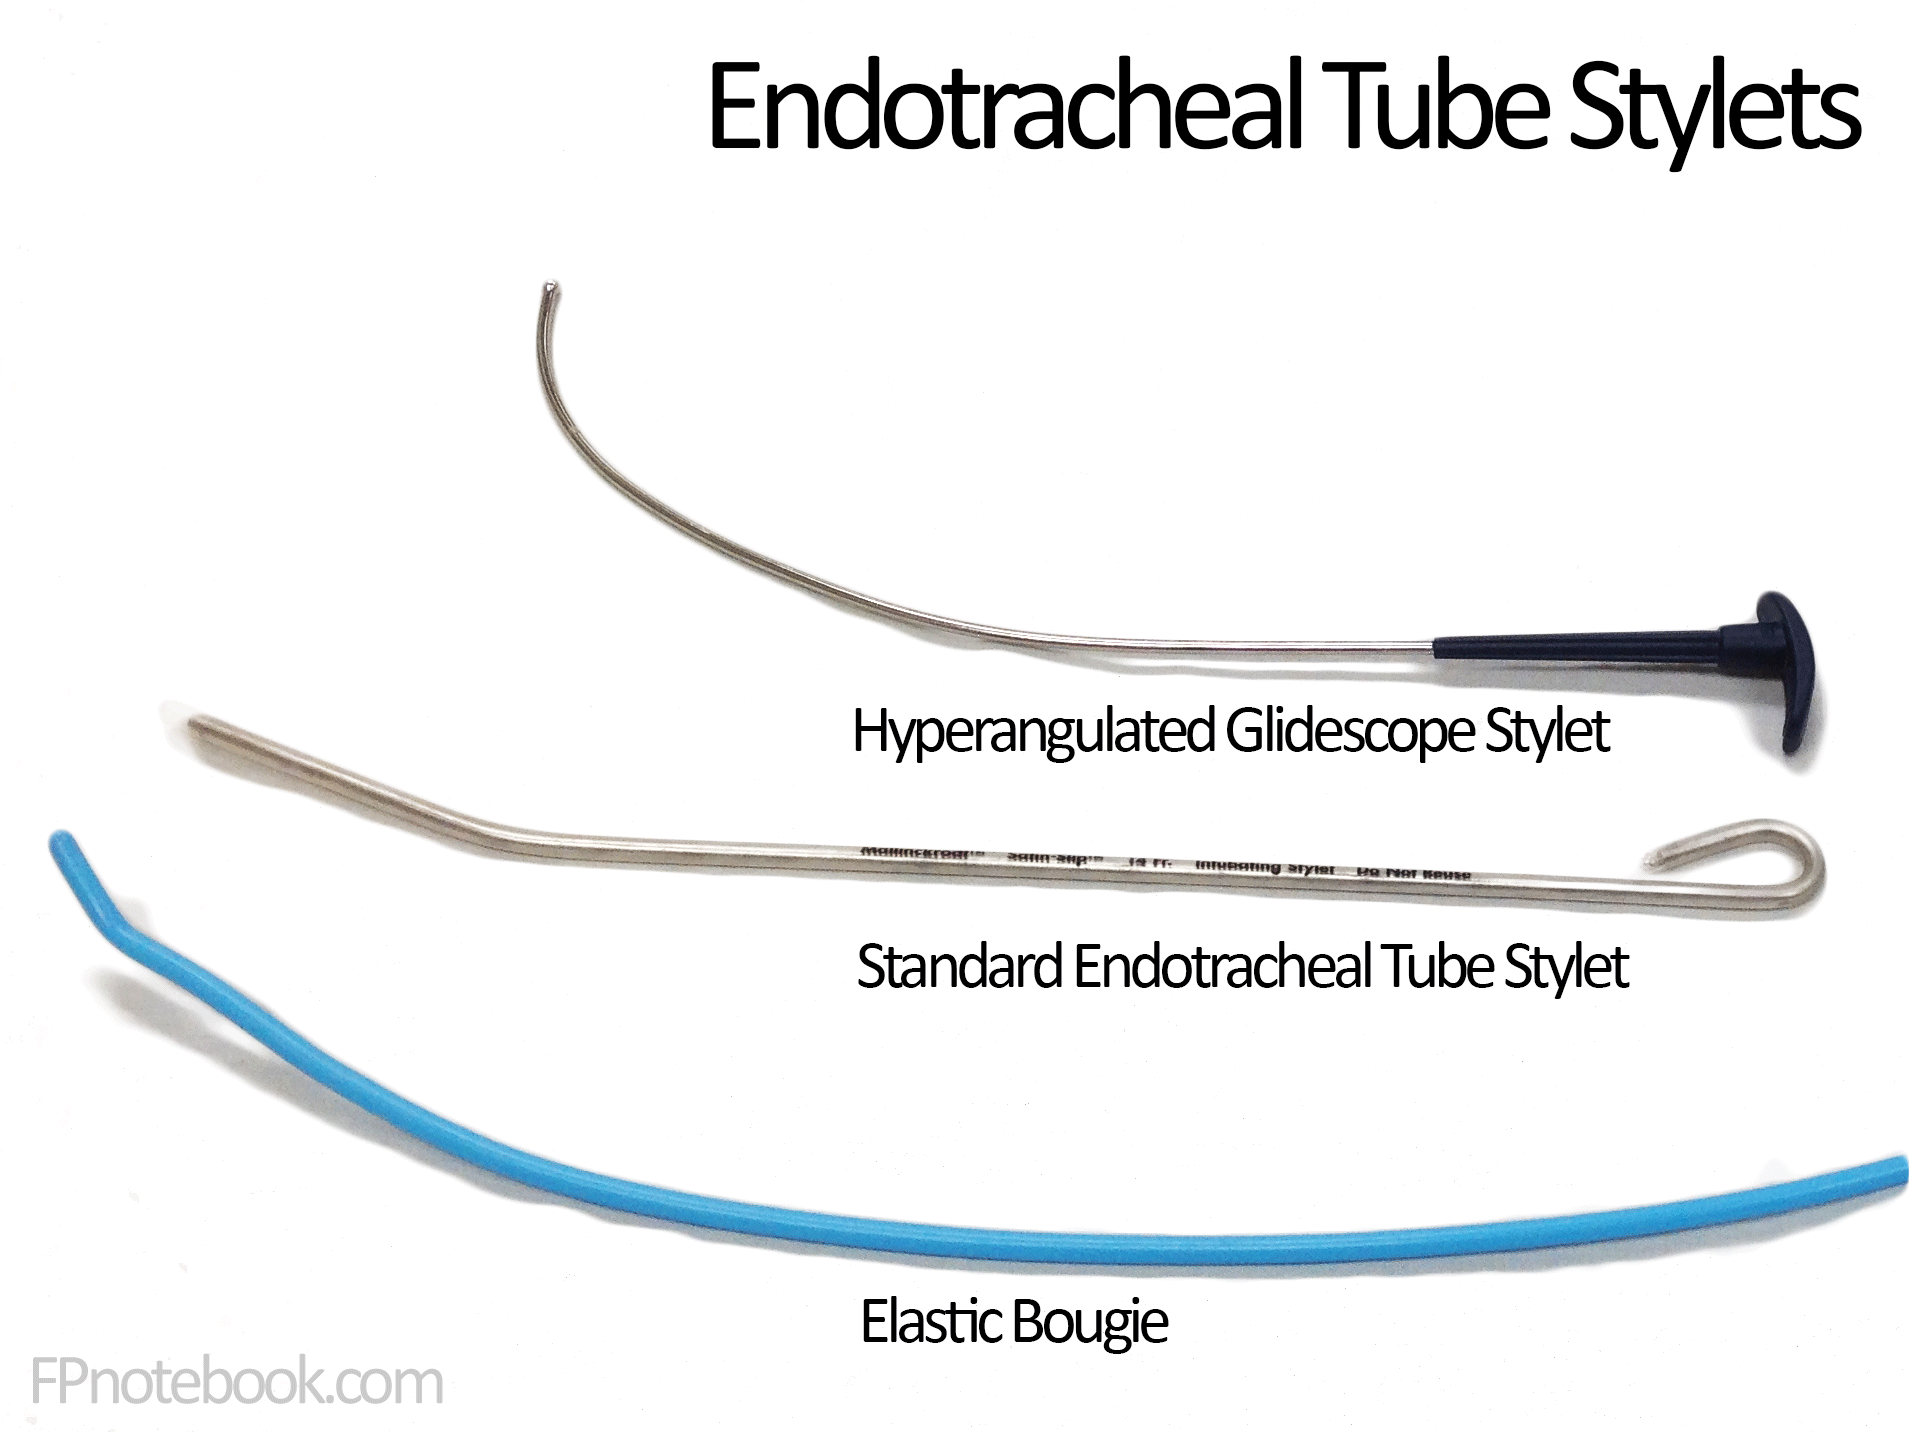
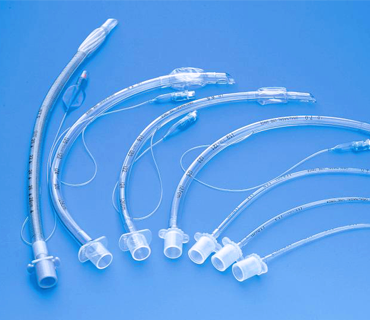
Video Laryngoscope (VL)

Video laryngoscope device comparison
Video laryngoscope various brands
  • Advantages: Improved glottic visualization, teaching tool, better first-pass success in many studies
  • Blade types: Standard geometry (similar angle to Macintosh) vs. hyperangulated (70-90° angle)
  • Common platforms: GlideScope, C-MAC, McGrath, King Vision
  • Technique adjustment: Hyperangulated blades require greater ETT curvature (stylet) and "looking around the corner"
  • Limitations: Can still fail with blood/secretions obscuring camera; don't abandon direct laryngoscopy skills

Stylet and Bougie

Various types of stylets and bougie
Various types of stylets / bougie

Stylet:

  • Malleable metal or plastic insert to shape the ETT
  • Direct laryngoscopy: Gentle "hockey stick" bend with tip at cuff level
  • Video laryngoscopy (hyperangulated): Greater curve to match blade angle, or "straight-to-cuff" approach
  • Safety: Ensure stylet tip does not extend beyond ETT Murphy eye to avoid trauma

Bougie (Gum Elastic Bougie / Eschmann Introducer):

  • Excellent rescue device when only partial glottic view obtained (Grade 2b-3 Cormack-Lehane)
  • Technique: Pass bougie when you see any glottic structures (even just arytenoids); feel for tracheal clicks or "hold-up" at carina confirming tracheal placement
  • Railroad the tube: Once bougie is in trachea, load ETT over it and advance into glottis
  • Rotation trick: If tube catches on arytenoids, rotate ETT 90° counterclockwise while advancing

Adjuncts and Backup Devices

Suction:

  • Yankauer (rigid): Standard oral suction for secretions, blood, vomit
  • Large-bore flexible catheter: For deeper suctioning through ETT or tracheostomy
  • SALAD technique: Suction-Assisted Laryngoscopy Airway Decontamination for heavily soiled airways; continuous suctioning during laryngoscopy

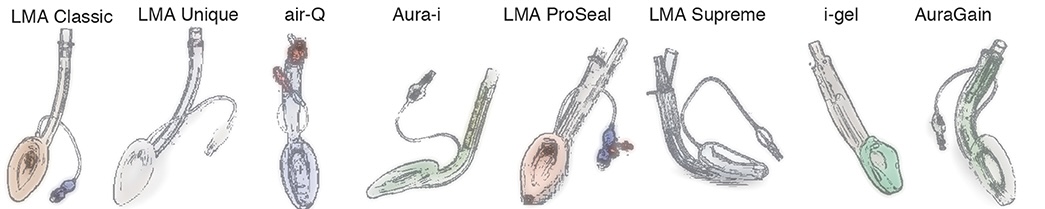
Supraglottic Airways (SGAs):

Various supraglottic airways
  • Types: King LT, i-gel, LMA (various models), Air-Q
  • Role: Rescue airway (Plan B) when intubation fails but ventilation is still possible
  • Some devices allow intubation through them: Air-Q, Fastrach LMA (intubating LMA)
  • Limitations: Don't protect against aspiration as well as ETT; may not seal adequately in high airway pressure scenarios
Cricothyrotomy kit
Surgical Airway Kit:
Cricothyrotomy emergency surgical airway kit
  • Adults: Scalpel-bougie-tube cricothyrotomy (preferred emergency technique)
  • Pediatrics: Needle cricothyrotomy with jet ventilation or BVM adapter (institutional protocol-dependent)
  • Contents: #10 scalpel, bougie, size 6.0 cuffed ETT or tracheostomy tube, tracheal hook, dilators
  • Availability: Should be immediately accessible at every intubation

Monitoring and Confirmation Devices

Mainstream capnography
Mainstream capnography sensor
Sidestream capnography
Sidestream capnography setup
Nasal capnography
Nasal capnography cannula
Colorimetric CO2 detector
Colorimetric CO₂ detector
  • Waveform capnography: Gold standard for tube placement confirmation and ongoing monitoring; inline or mainstream sensor
  • Colorimetric EtCO₂ detector: Backup chemical indicator; color changes from purple (low CO₂) to yellow (CO₂ present)
  • Pulse oximetry: Continuous SpO₂ monitoring
  • Cardiac monitor: Heart rate, rhythm, blood pressure
  • Blood pressure: Automated cycling or arterial line for continuous monitoring

Before EVERY intubation, verify:

  • ✓ Suction on and within reach (test it!)
  • ✓ Oxygen source connected and flowing
  • ✓ BVM assembled with PEEP valve and reservoir
  • ✓ Laryngoscope blade attached and light working
  • ✓ ETT size selected, cuff tested, stylet/bougie ready
  • ✓ Backup smaller ETT available
  • ✓ SGA at bedside (know your size!)
  • ✓ Surgical airway kit present and unopened
  • ✓ Capnography connected and ready
  • ✓ Medications drawn and labeled
  • ✓ IV access confirmed and flushed
Preoxygenation & Positioning

Team Brief & Checklist

Before induction, conduct a brief team huddle:

  • Assign roles: Laryngoscopist, oxygen/BVM manager, medication nurse/medic, monitor watcher/scribe
  • Confirm monitors: ECG, SpO₂, blood pressure, capnography ready and functioning
  • Verbalize the plan: Explicitly state Plan A (primary ETI approach), Plan B (supraglottic airway), and Plan C (surgical airway)
  • Final equipment check: Test suction, verify oxygen flow, confirm medications drawn and labeled
  • Abort criteria: Agree on when to stop the attempt (SpO₂ < 90%, time > 30 seconds, no progress)

Optimal Positioning

Ramped positioning for intubation
Ramped positioning: ear-to-sternal-notch alignment

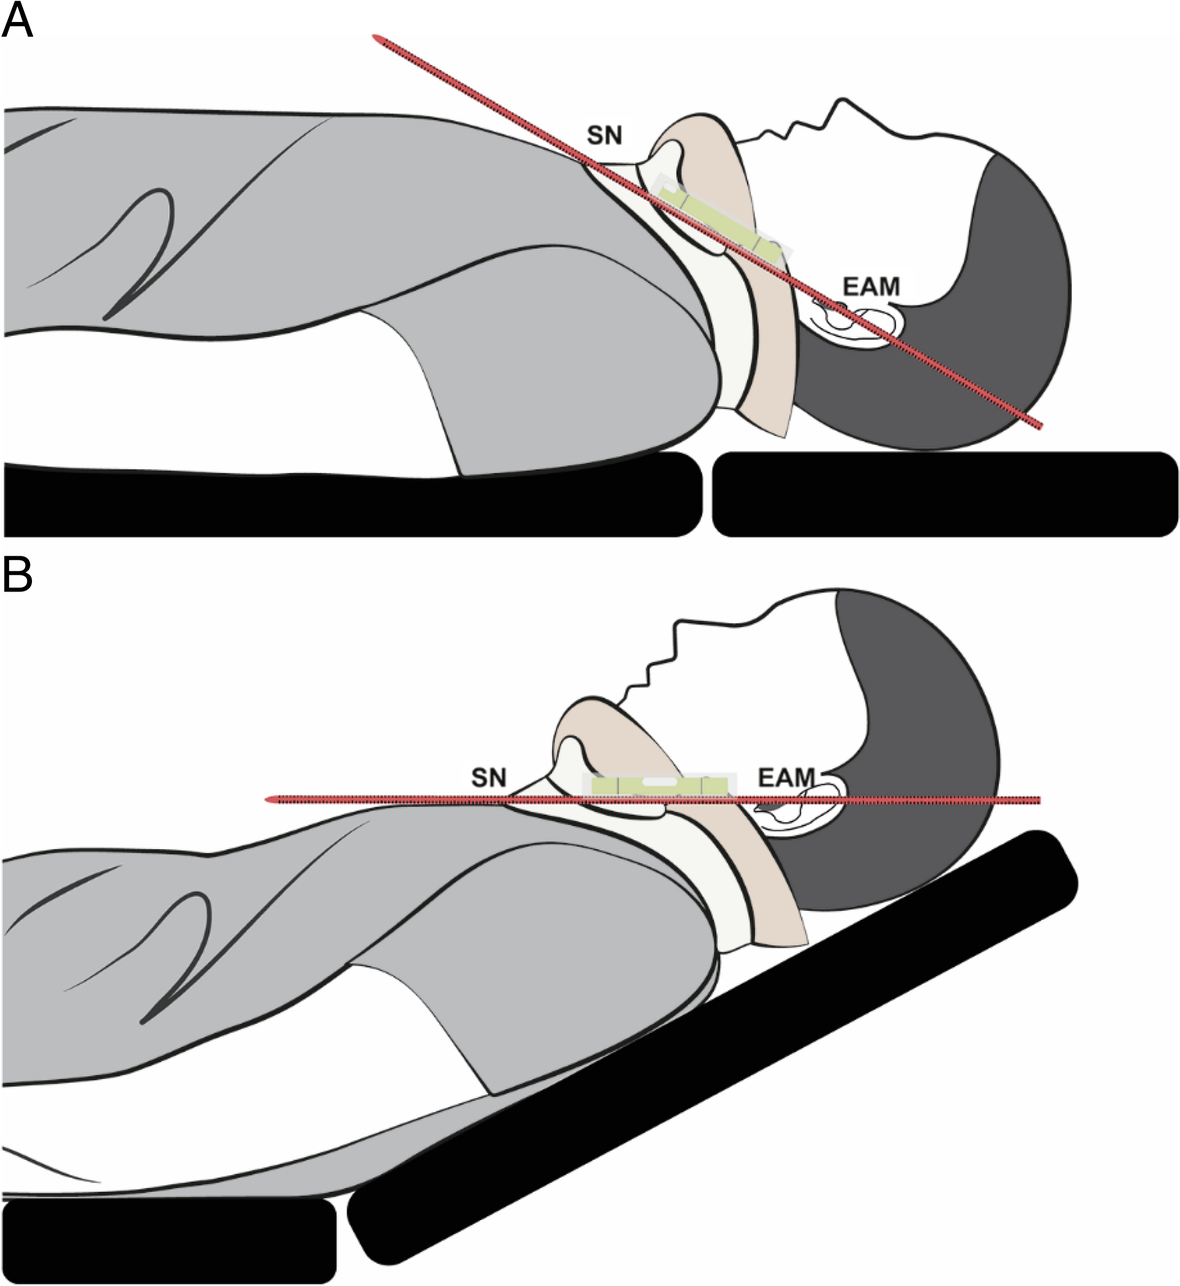
Ramped / Ear-to-Sternal-Notch Position:

  • Align external auditory meatus with sternal notch in the horizontal plane
  • Use pillows, blankets, or commercial ramp devices under upper back and head
  • Critical for obese patients: Significantly improves glottic view and safe apnea time
  • Can also use reverse Trendelenburg (head up) on stretcher

Avoid flat supine positioning when possible:

  • Reduces functional residual capacity (FRC)
  • Worsens V/Q matching in respiratory failure patients
  • Can compromise venous return in shock patients

Preoxygenation Strategies

Goal: Achieve SpO₂ ≥ 94% and maximize nitrogen washout to extend safe apnea time

For Spontaneously Breathing Patients:

  • Non-rebreather mask: Tight-fitting at flush rate (> 15 L/min)
  • High-flow nasal cannula (HFNC): 40-60 L/min when available; provides both preoxygenation and apneic oxygenation
  • Combination approach: HFNC + non-rebreather or BVM mask for maximum FiO₂
  • Duration: At least 3 minutes of tidal breathing OR 8 vital capacity breaths when time allows

For Apneic or Hypoventilating Patients:

  • Use BVM with high FiO₂ (reservoir connected), proper PEEP valve (5-10 cm H₂O), and two-hand mask seal with jaw thrust
  • Avoid hyperventilation: Target normal respiratory rate (12-16/min) and appropriate tidal volume for patient size
  • Gentle ventilation reduces risk of gastric insufflation and aspiration
  • In severe ARDS, try to match pre-intubation PEEP levels during BVM to prevent derecruitment

Apneic Oxygenation During Laryngoscopy:

  • Place nasal cannula at 10-15 L/min during the intubation attempt
  • Continue oxygen flow even when BVM or mask is removed
  • Provides passive oxygen flow into pharynx, extending safe apnea time by several minutes
  • Most effective when combined with excellent preoxygenation

The "sick, shocked, and pregnant" patient triad: These patients have dramatically reduced safe apnea times (often 1-2 minutes vs. 8+ minutes in healthy patients) due to:

  • Increased oxygen consumption (sepsis, pregnancy, high work of breathing)
  • Reduced oxygen reserve (obesity, atelectasis, lung pathology)
  • Poor preoxygenation tolerance (unable to cooperate, agitated)

Maximize preoxygenation time, consider delayed sequence intubation (DSI), and prepare for rapid desaturation.

Step-by-Step Intubation Technique

General Principles: Pre-brief that if SpO₂ drops below ~90% or attempt time approaches 20-30 seconds, the attempt will be aborted, BVM ventilation resumed, and the plan reassessed. RSI medications are chosen per your local protocol; this section focuses on the mechanical aspects of intubation.

Step 1: Final Pre-Attempt Check

  • Pause for a "STOP–OXYGEN–POSITION–PLAN" moment
  • Confirm suction working and within reach
  • Verify BVM, SGA, and surgical airway kit at bedside
  • Check that assistant is ready and monitoring SpO₂/time
  • Remove dentures, oral appliances, or foreign bodies if present

Step 2: Mouth Opening and Blade Insertion

  • Use scissor technique to open the mouth (thumb on lower incisors, index finger on upper)
  • Insert blade from the right side of mouth, sweeping tongue to the left
  • Advance blade in midline along the tongue until you visualize the uvula, then continue to the epiglottis
  • Avoid teeth contact; use blade to displace tongue, not as a lever against teeth

Step 3: Expose the Glottis

Macintosh (Curved) Blade Technique:

  • Place blade tip in the vallecula (the space between base of tongue and epiglottis)
  • Lift along the axis of the handle (up and away toward the ceiling at 45°), not rocking back toward yourself
  • This lifts the hyoepiglottic ligament and indirectly raises the epiglottis
  • Avoid using teeth as a fulcrum (causes dental trauma)

Miller (Straight) Blade Technique:

  • Advance blade tip past the epiglottis and place directly on its laryngeal surface
  • Lift the epiglottis directly upward to expose the vocal cords
  • More control over floppy epiglottis or anterior larynx

Optimize the View:

  • External laryngeal manipulation (ELM): Have assistant apply backward-upward-rightward pressure (BURP) on thyroid cartilage
  • Suction aggressively: Clear blood, secretions, or vomit obscuring the view
  • Minor adjustments: Small head/neck position changes while maintaining c-spine precautions in trauma
  • Cricoid pressure is controversial: May worsen view; release if no improvement

Step 4: Bougie or Tube Placement

If you have a good view (Cormack-Lehane Grade 1-2a):

  • Pass the ETT directly through the vocal cords under direct visualization
  • Advance until the cuff just passes the cords (you'll see black line on tube pass between cords)
  • Typical depth: 21-23 cm at the teeth for adults

If only partial view (Grade 2b-3: see arytenoids or epiglottis tip):

  • Pass the bougie first: Aim toward the area where you see glottic structures
  • Feel for confirmation: Tracheal "clicks" as bougie passes over cartilaginous rings, or "hold-up" at carina (typically 25-30 cm)
  • Railroad the ETT over bougie: Load tube over bougie like threading a bead on a string
  • If tube catches on arytenoids: Rotate ETT 90° counterclockwise while advancing, or withdraw slightly and advance with rotation
  • Once tube is in, remove bougie while maintaining tube position

Step 5: Cuff Inflation and Connection

  • Inflate the cuff to create an adequate seal (use cuff manometer if available; target 20-30 cm H₂O)
  • Overinflation can cause tracheal mucosal ischemia; underinflation risks aspiration
  • Connect ETT to BVM or ventilator circuit
  • Begin gentle ventilation (6-8 mL/kg ideal body weight)

Step 6: Confirmation of Tube Placement

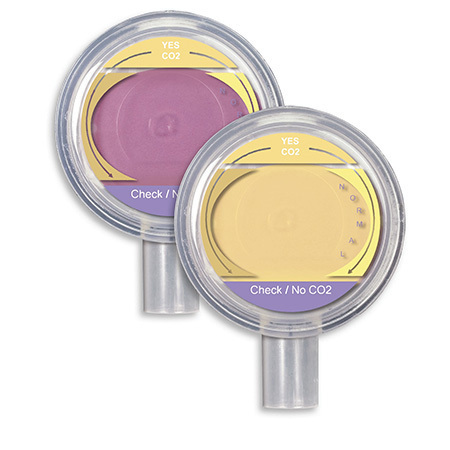
Primary confirmation - MUST HAVE:

  • Continuous waveform capnography: Gold standard showing sustained square wave over 5-6 breaths
  • EtCO₂ value typically 35-45 mmHg in perfusing patient
  • Rule: "No waveform = not in the trachea until proven otherwise"
Esophageal vs tracheal intubation waveforms
Comparison of capnography waveforms: esophageal intubation (top) vs. tracheal intubation (bottom)

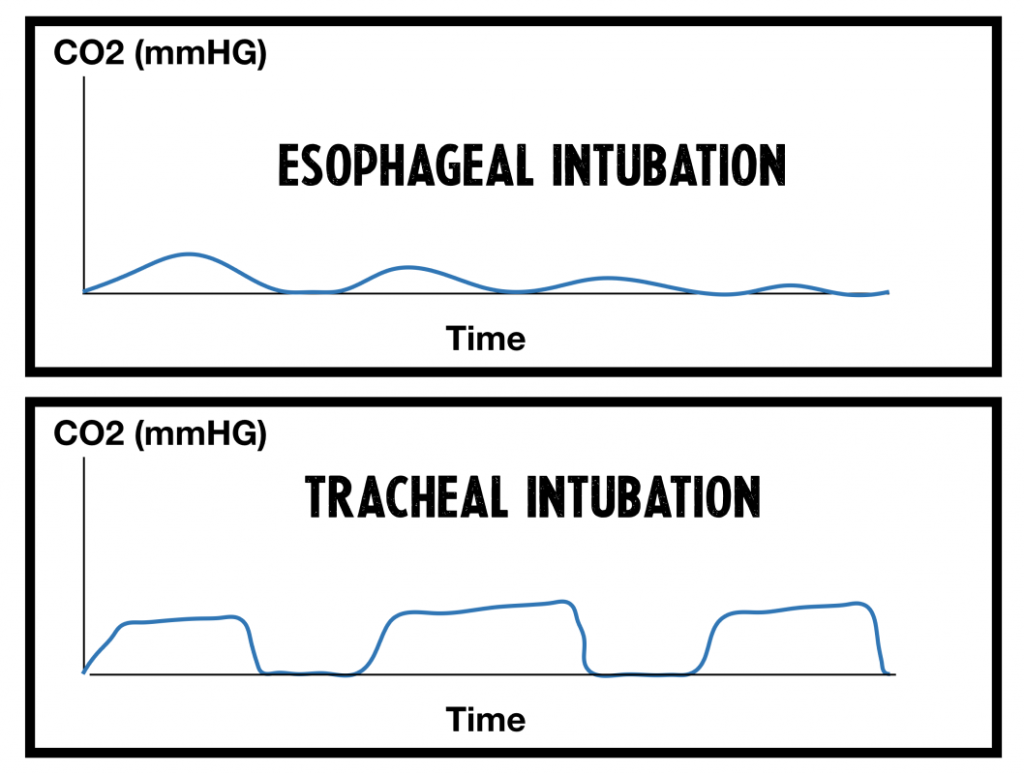
Secondary confirmation:

  • Bilateral chest rise with ventilation
  • Symmetric breath sounds in bilateral axillae (listen high to avoid referred sounds)
  • Absence of epigastric sounds (gurgling over stomach suggests esophageal intubation)
  • Improvement in SpO₂ (if patient was hypoxemic)
  • Fogging in ETT (unreliable, especially in hypothermic patients)

Document:

  • ETT size used (e.g., 7.5 mm)
  • Depth at the teeth or gum line (e.g., "23 cm at teeth")
  • Method of confirmation (waveform capnography, EtCO₂ value)
  • Number of attempts
  • Laryngoscopic grade (Cormack-Lehane)

Step 7: Securing the Tube

  • Use a commercial tube holder (preferred) or well-applied tape
  • Avoid hand-holding as the only securement method (team fatigue, accidental extubation)
  • Consider bite block or oral airway to prevent tube occlusion from biting
  • Re-check tube position after securing: Auscultate, verify depth, confirm continued capnography waveform
  • Reassess after any patient move: Transfer to stretcher, transport, repositioning
  • Order post-intubation chest X-ray to verify tube position (tip 4-5 cm above carina)

The right mainstem bronchus is more vertical than the left, making it easy to advance the tube too far. Signs of right mainstem intubation:

  • Breath sounds louder on right, diminished on left
  • Decreased left chest rise
  • Rising peak airway pressures
  • Hypoxemia despite intubation

Fix: Deflate cuff, withdraw tube 1-2 cm while auscultating, reinflate cuff, reassess. Typical adult depth is 21-23 cm at teeth (3x ETT internal diameter is a useful rule).

Capnography & Waveform Interpretation

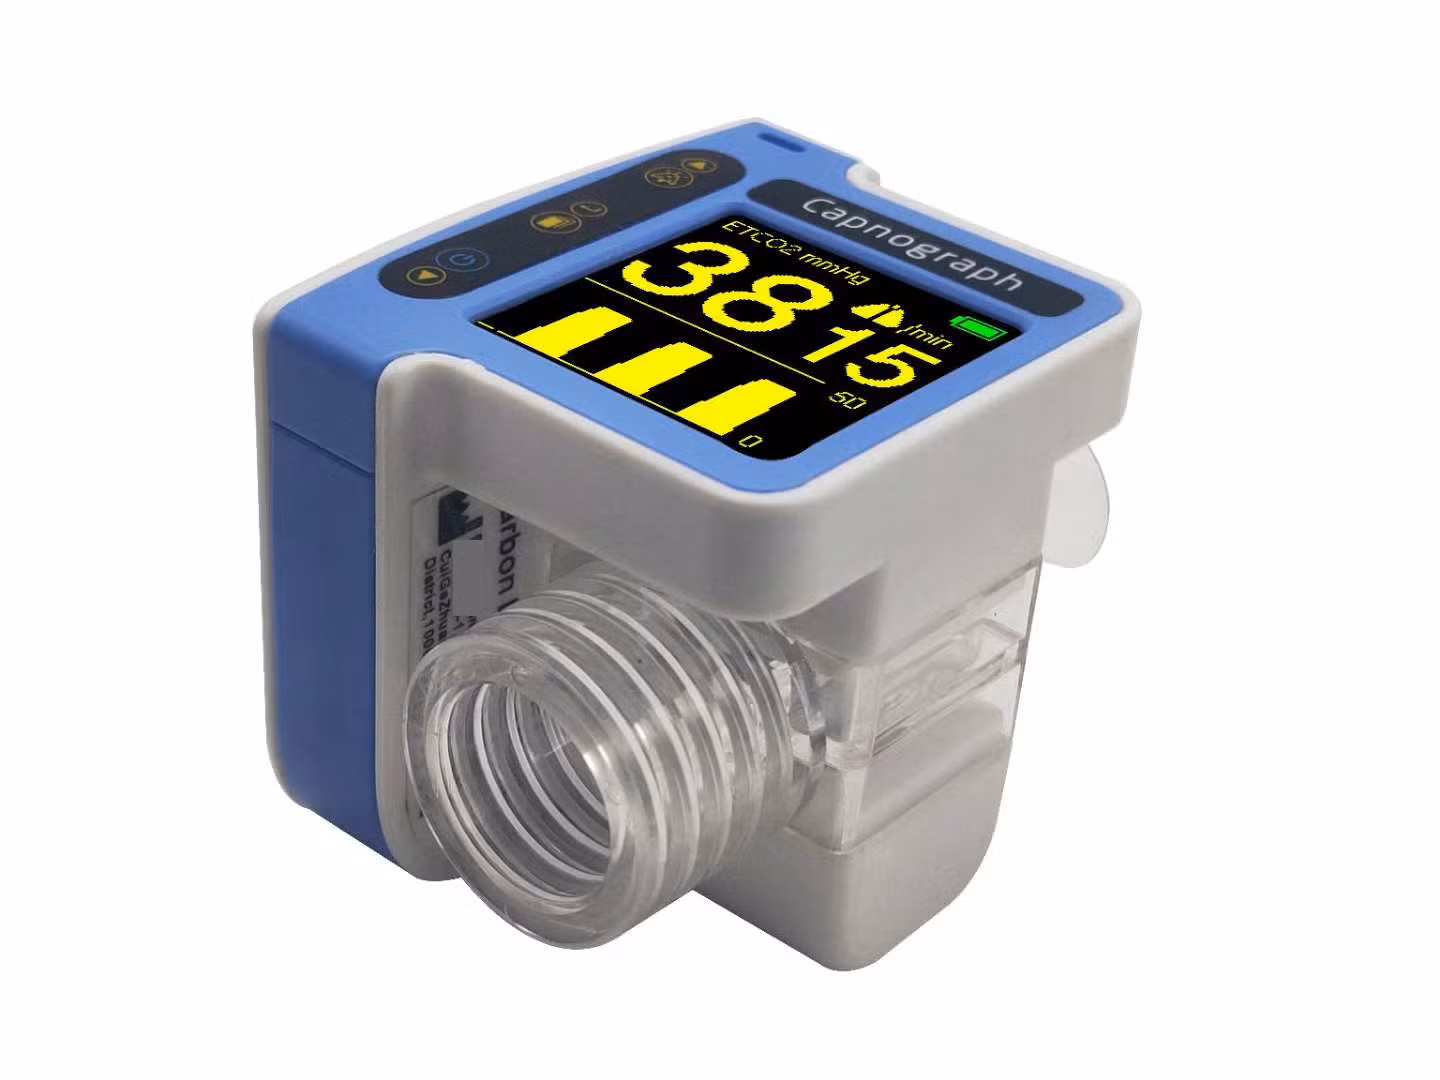
Capnography is the primary tool for confirming endotracheal tube placement and monitoring ongoing ventilation status. Waveform analysis provides real-time feedback on tube position, ventilation adequacy, circuit problems, and patient physiology.

ETCO2 capnography phases
Capnography waveform phases during respiratory cycle

Normal Capnography Waveform

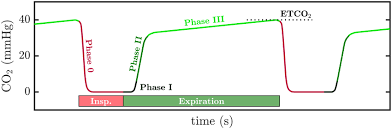
Four phases of normal waveform:

  • Phase 0 (Inspiratory Baseline): Rapid downstroke to baseline as fresh gas with no CO₂ is inhaled
  • Phase I (Expiratory Baseline): Flat baseline near zero as anatomic dead space gas is exhaled first
  • Phase II (Expiratory Upstroke): Rapid rise as alveolar gas containing CO₂ begins to be exhaled
  • Phase III (Alveolar Plateau): Plateau representing alveolar gas; end-tidal CO₂ (EtCO₂) is measured at the end of this phase

Normal EtCO₂ values: 35-45 mmHg in a perfusing patient (slightly lower than arterial PaCO₂ due to alveolar dead space)
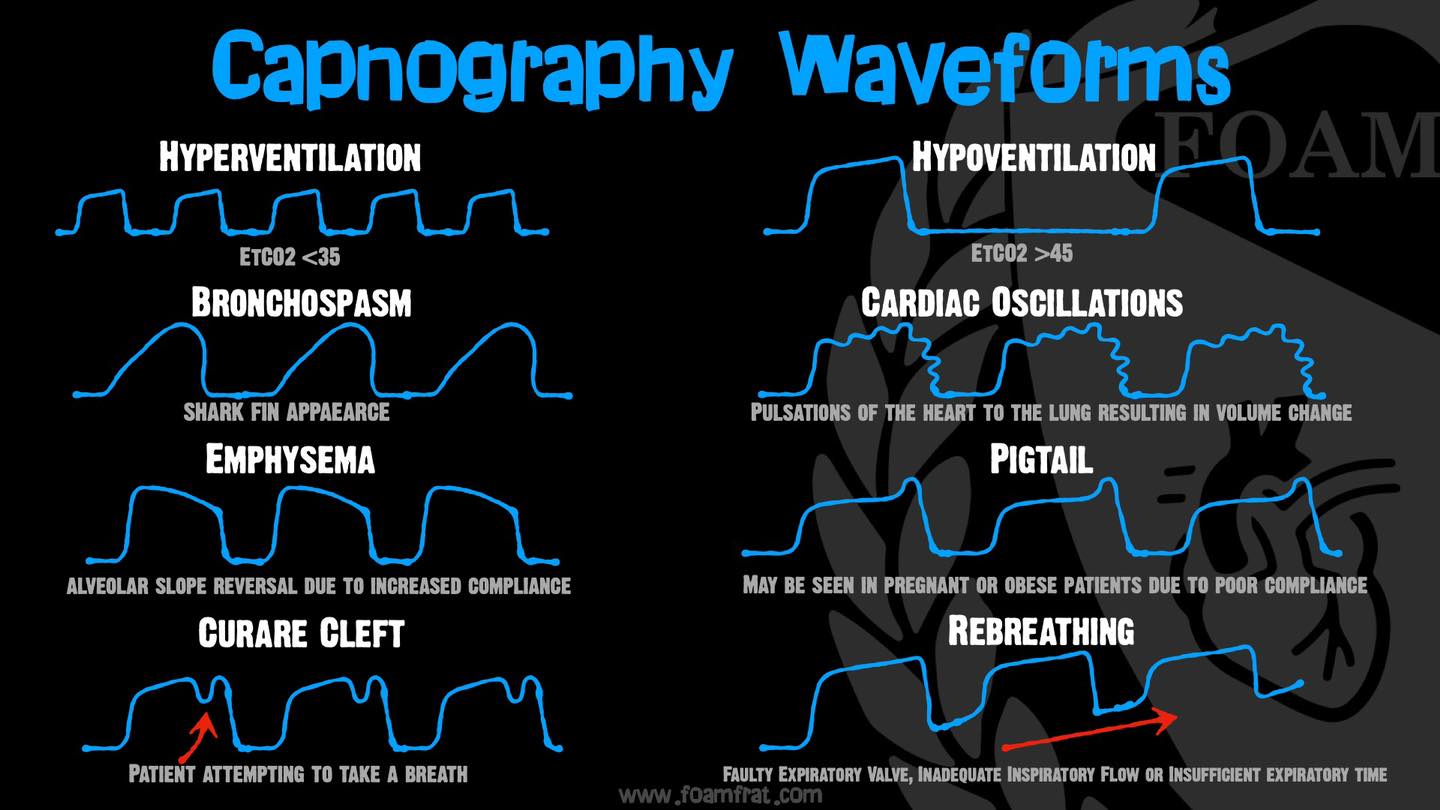
Abnormal Waveforms and Troubleshooting

Shark-fin capnography waveform
Shark-fin waveform indicating bronchospasm or airflow obstruction

No Waveform or Sudden Loss of EtCO₂

Think DOPE/DOPES:

Swipe to see more
Problem Signs Action
Dislodged tube Sudden loss of waveform, absent breath sounds, gurgling over stomach Remove tube, reoxygenate with BVM, re-intubate
Obstruction High peak pressures, no chest rise, kinked tube, biting, mucus plug Suction, pass catheter through tube, adjust bite block, bronchodilators if bronchospasm
Pneumothorax Unilateral absent breath sounds, hypotension, high pressures, neck vein distension Needle decompression or chest tube, reassess ventilation
Equipment failure Check capnograph, circuit disconnection, ventilator malfunction Switch to BVM, replace circuit, check all connections
Stacked breaths / hypoventilation Auto-PEEP, inadequate expiratory time Decrease respiratory rate, increase expiratory time, check for air trapping

Shark-Fin or Slurred Upstroke

  • Appearance: Prolonged, sloped Phase II and III instead of sharp square corners
  • Indicates: Bronchospasm or airflow obstruction (asthma, COPD, kinked tube, small tube diameter)
  • Treatment: Bronchodilators (albuterol, ipratropium), adjust ventilator settings to allow longer expiratory time (I:E ratio 1:3 to 1:4), consider larger ETT if tube size is limiting

Gradual Rise in EtCO₂

  • Causes: Hypoventilation (rate too slow, tidal volume too low), improved perfusion (ROSC after cardiac arrest, fluid resuscitation), rising body temperature (fever, malignant hyperthermia), increased CO₂ production (shivering, seizures)
  • Action: Increase minute ventilation if inadequate, treat underlying cause

Falling EtCO₂

  • Causes: Hyperventilation (rate too fast, TV too high), decreased cardiac output (shock, hemorrhage, cardiac arrest), pulmonary embolism (increased dead space), hypothermia
  • Action: Decrease minute ventilation if excessive, treat shock/hypotension, consider PE in appropriate context

Sudden Loss of Waveform Without Tube Dislodgement

  • Consider: Cardiac arrest (no perfusion = no CO₂ delivery to lungs), massive PE, circuit disconnection, capnograph sensor failure
  • Action: Immediately assess pulse and blood pressure, begin CPR if no pulse, check all equipment connections

EtCO₂ during CPR provides real-time feedback on resuscitation quality:

  • EtCO₂ < 10 mmHg: Poor perfusion; improve CPR quality, consider reversible causes
  • EtCO₂ 10-20 mmHg: Adequate CPR
  • Sudden rise to > 40 mmHg: Suggests return of spontaneous circulation (ROSC); check pulse
Post-Intubation Ventilator Management

Initial Ventilator Settings (Lung-Protective Approach)

For average adult (ARDS or general critical care patient):

  • Mode: Assist-Control (AC) volume control or pressure control
  • Tidal volume: 6-8 mL/kg ideal body weight (IBW), not actual weight
    • IBW (males) = 50 kg + 2.3 kg × (height in inches − 60)
    • IBW (females) = 45.5 kg + 2.3 kg × (height in inches − 60)
  • Respiratory rate: 12-20 breaths/min; adjust based on EtCO₂ and blood gas/pH
  • FiO₂: Start at 1.0 (100%), then titrate down to maintain SpO₂ 92-96% (88-92% in COPD patients)
  • PEEP: Start at 5 cm H₂O; increase cautiously in hypoxemic patients (consider 8-12 cm H₂O in ARDS)
  • Inspiratory flow: 60 L/min (can adjust based on patient comfort and ventilator synchrony)
  • Plateau pressure: Target < 30 cm H₂O to avoid barotrauma

Special Populations

Obstructive Lung Disease (Asthma / COPD Exacerbation)

  • Lower respiratory rate: 8-12 breaths/min (allow longer exhalation)
  • Lower tidal volume: 6-7 mL/kg IBW (permissive hypercapnia strategy)
  • I:E ratio: Prolong expiratory time to 1:3 or 1:4 (prevent air trapping and auto-PEEP)
  • Low or zero PEEP: Patients often have intrinsic PEEP; adding external PEEP can worsen hyperinflation
  • Monitor auto-PEEP: Check expiratory flow graphics; if flow doesn't return to baseline before next breath, auto-PEEP is present
  • Accept permissive hypercapnia: pH > 7.20 is acceptable to avoid aggressive ventilation causing barotrauma
  • Bronchodilators: Continue aggressive inhaled beta-agonists and anticholinergics

ARDS (Acute Respiratory Distress Syndrome)

  • Strict low tidal volume: 6 mL/kg IBW (proven mortality benefit)
  • Higher PEEP: 10-15 cm H₂O (recruit collapsed alveoli, prevent atelectrauma)
  • Plateau pressure < 30 cm H₂O: Mandatory to prevent volutrauma
  • FiO₂/PEEP titration: Use ARDS network tables to balance oxygenation and minimize toxicity
  • Permissive hypercapnia: Accept elevated CO₂ to maintain lung-protective ventilation
  • Consider prone positioning: If PaO₂/FiO₂ < 150 despite optimized ventilator settings
  • Sedation and paralysis: May be needed in first 48 hours for severe ARDS (improves ventilator synchrony)

Traumatic Brain Injury (TBI)

  • Target normocapnia: PaCO₂ 35-40 mmHg (avoid hyperventilation unless acute herniation)
  • Reason: Hypocapnia causes cerebral vasoconstriction reducing cerebral blood flow; hypercapnia increases intracranial pressure
  • SpO₂ goal: > 94% (avoid hypoxemia which worsens TBI outcomes)
  • Avoid excessive PEEP: High PEEP can increase intracranial pressure by impeding venous return

Monitoring After Intubation

Continuous monitoring:

  • SpO₂ and waveform capnography: Trend over time, not just spot checks
  • Ventilator pressures: Peak inspiratory pressure (PIP), plateau pressure (Pplat), auto-PEEP
  • Tidal volume delivered: Actual may differ from set (compliance-dependent)
  • Minute ventilation: Respiratory rate × tidal volume
  • Hemodynamics: Blood pressure, heart rate, signs of shock or right heart strain

Periodic assessments:

  • Arterial blood gas: 30-60 minutes post-intubation and with any major ventilator changes
  • Chest X-ray: Confirm tube position, assess lung pathology, check for pneumothorax
  • Ventilator synchrony: Is patient fighting the ventilator? Consider adjusting settings or sedation

Common and dangerous complication occurring in up to 25% of emergency intubations. Causes include:

  • Sedative/analgesic effects: Unmasking hypovolemia or reduced sympathetic tone
  • Loss of respiratory drive compensation: Particularly in acidotic or septic patients who were compensating with high minute ventilation
  • Positive pressure ventilation: Reduces venous return (preload), can precipitate shock in volume-depleted patients
  • Tension pneumothorax: From barotrauma or underlying lung pathology
  • Auto-PEEP: Severe air trapping in asthma/COPD causing cardiovascular collapse

Prevention/Management: Optimize volume status before intubation, use push-dose pressors, minimize PEEP/respiratory rate if hemodynamic instability develops.

Troubleshooting Difficult or Failed Intubation

If You Cannot See the Cords (Poor Glottic View)

Re-optimize positioning:

  • Re-ramp patient (check ear-to-sternal-notch alignment)
  • Adjust head position (sniffing position with neck flexion, head extension)
  • In trauma with c-collar: remove anterior portion and switch to manual in-line stabilization when safe

Change equipment:

  • Switch blade types: Macintosh to Miller or vice versa
  • Switch blade size: Try larger (Mac 4) or smaller (Mac 2) blade
  • Switch to video laryngoscopy: If starting with direct laryngoscopy (DL), VL often provides better view
  • Change VL blade type: Standard geometry to hyperangulated or vice versa

Improve the field:

  • Suction aggressively: Use SALAD (Suction-Assisted Laryngoscopy Airway Decontamination) for heavily soiled airways—continuous suctioning during laryngoscopy
  • External laryngeal manipulation (ELM): Have assistant apply backward-upward-rightward pressure (BURP) on thyroid cartilage
  • Release cricoid pressure: If applied and not helping, it may worsen the view

Use a bougie early:

  • If you can see ANY glottic structures (even just posterior arytenoids), pass the bougie
  • Don't wait for a "perfect" view—bougie turns a Grade 2b-3 view into a successful intubation

If You Cannot Pass the Tube (But See the Cords)

Adjust the tube/stylet:

  • Check stylet shape: Too much angulation can make the tube difficult to pass through cords
  • Withdraw slightly and rotate: Pull tube back 1-2 cm, rotate 90° counterclockwise, then advance
  • Use a smaller ETT: Size down by 0.5 mm (e.g., from 7.5 to 7.0)

Optimize visualization:

  • Ensure you're maintaining the best glottic view while advancing the tube
  • Have assistant hold external laryngeal manipulation (ELM) position once optimal view achieved

Consider bougie-assisted:

  • Even with good view, if tube won't pass, try bougie first then railroad tube over it
  • Rotation trick: Rotate tube counterclockwise 90° as you advance over bougie past arytenoids

If You Can't Intubate But Can Ventilate

Prioritize oxygenation over intubation:

  • Resume BVM ventilation: High FiO₂, two-hand technique, jaw thrust, OPA/NPA adjuncts
  • Reassess patient stability: Is the situation improving? Is intubation still necessary?
  • Call for help: Additional experienced providers, anesthesia, ENT if available

Place supraglottic airway early (Plan B):

  • Don't make >2-3 intubation attempts if not progressing
  • Insert King LT, i-gel, LMA, or your institution's preferred SGA
  • Use as definitive airway or bridge depending on clinical context and transport time
  • Some SGAs (Air-Q, Fastrach LMA) allow intubation through them

Alternative intubation strategies:

  • Awake intubation: Fiberoptic or video laryngoscopy with topical anesthesia (if patient cooperation possible)
  • Delayed sequence intubation (DSI): Ketamine dissociation to allow preoxygenation in uncooperative patients before RSI
  • Consider transport with SGA: If stable with SGA and definitive airway can be secured in OR or by specialist

Can't Intubate, Can't Oxygenate (CICO) - Emergency!

Declare CICO emergency out loud:

  • "This is a can't intubate, can't oxygenate situation—preparing for surgical airway"
  • Call for additional help immediately
  • Assign roles: one person on surgical airway, one continuing oxygenation attempts, one documenting

Criteria for declaring CICO:

  • Unable to intubate after 2-3 attempts
  • Unable to ventilate with BVM despite optimal technique
  • SGA placement unsuccessful or ineffective
  • SpO₂ falling despite maximal oxygen delivery
  • Time running out (patient deteriorating, bradycardia, cardiac arrest imminent)

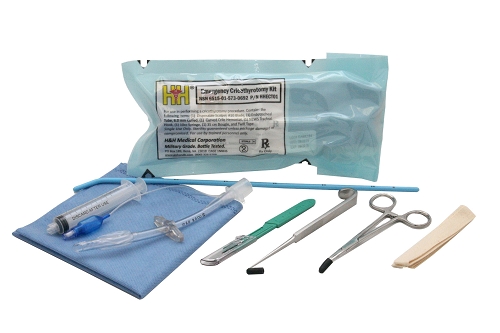
Proceed immediately to surgical airway (Plan C):

  • Adults: Scalpel–bougie–tube cricothyrotomy (preferred)
    • Palpate cricothyroid membrane (between thyroid and cricoid cartilage)
    • Stabilize larynx with non-dominant hand
    • Horizontal stab incision through skin and cricothyroid membrane with #10 scalpel
    • Insert bougie through incision into trachea (feel clicks, aim caudally)
    • Railroad size 6.0 cuffed ETT or tracheostomy tube over bougie
    • Inflate cuff, ventilate, confirm with capnography
  • Pediatrics < 10 years: Needle cricothyrotomy with jet ventilation or BVM adapter (institution-dependent)
    • 14G or 16G IV catheter through cricothyroid membrane
    • Attach to high-pressure oxygen source with pressure regulator
    • Jet insufflation: 1 second on, 4 seconds off (allow exhalation)
    • Monitor for adequate chest rise and watch for barotrauma

Multiple failed attempts with worsening hypoxemia, hypotension, and acidosis create a vicious cycle. Each attempt becomes more difficult as the patient deteriorates. Prevent this by:

  • Limiting attempts (maximum 2-3 before changing approach)
  • Declaring "failed intubation" early and moving to Plan B/C
  • Maintaining excellent preoxygenation and apneic oxygenation
  • Aborting attempts when SpO₂ drops below 90% (resume BVM ventilation)
  • Having pre-planned rescue strategies (SGA, surgical airway) ready before first attempt
Education & Skill Maintenance

Maintaining Competency

  • Regular simulation practice: Manikin and high-fidelity simulation with full team participation improves first-pass success rates and safety
  • Cross-train on equipment: Familiarize yourself with all airway devices in your system—different VL platforms, blade types, SGAs, bougies, and adjuncts
  • Practice assessment tools: Use LEMON and HEAVEN assessments on every patient, not just difficult airways
  • Recognize physiologic difficulty: Develop pattern recognition for high-risk patients (severe ARDS, shock, pregnancy, obesity)
  • Debriefing culture: Debrief after every intubation (successful or not) to identify improvement opportunities for individual providers and team systems

Recommended Resources

  • FOAMed (Free Open Access Medical Education):
    • FOAMfrat: Capnography and oxygenation workbooks
    • LITFL (Life in the Fast Lane): Airway management and difficult airway series
    • EMCrit: Podcast and blog on resuscitation and critical care airways
    • Deranged Physiology: In-depth physiology review
  • Courses:
    • Difficult Airway Course (DAC)
    • SLAM (Sedation Learning and Airway Management)
    • Local institutional airway workshops
  • Guidelines:
    • ASA Practice Guidelines for Management of the Difficult Airway
    • NAP4 (4th National Audit Project): Major complications of airway management in the UK
    • Vortex Approach to airway management

References (APA 7th Edition)

  1. Alvarado, A. C., Panakos, P., & Mullan, P. C. (2023). Endotracheal intubation techniques. StatPearls Publishing. https://www.ncbi.nlm.nih.gov/books/NBK539747/
  2. Apfelbaum, J. L., Hagberg, C. A., Connis, R. T., Abdelmalak, B. B., Agarkar, M., Dutton, R. P., Fiadjoe, J. E., Greif, R., Klock, P. A., Jr., Mercier, D., Myatra, S. N., O'Sullivan, E. P., Rosenblatt, W. H., Sorbello, M., & Tung, A. (2022). 2022 American Society of Anesthesiologists practice guidelines for management of the difficult airway. Anesthesiology, 136(1), 31–81. https://doi.org/10.1097/ALN.0000000000004002
  3. Brown, C. A., III, Bair, A. E., Pallin, D. J., & Walls, R. M. (2015). Techniques, success, and adverse events of emergency department adult intubations. Annals of Emergency Medicine, 65(4), 363–370. https://doi.org/10.1016/j.annemergmed.2014.10.036
  4. Chrimes, N. (2016). The Vortex: A universal 'high-acuity implementation tool' for emergency airway management. British Journal of Anaesthesia, 117(Suppl 1), i20–i27. https://doi.org/10.1093/bja/aew175
  5. FOAMfrat. (n.d.). Capnography workbook and oxygenation workbook. FOAMfrat.com. Retrieved November 23, 2025, from https://foamfrat.com
  6. IA MED. (2020). Flight medical provider study guide: Advanced airway & mechanical ventilation. IA MED Training Solutions.
  7. Nickson, C. (2024). Endotracheal tube (standard). Life in the Fast Lane – Critical Care Compendium. Retrieved November 23, 2025, from https://litfl.com/endotracheal-tube/
  8. Wang, H. E. (2015). Eight strategies for safer prehospital intubation. Journal of Emergency Medical Services (JEMS), 40(3). Retrieved from https://www.jems.com
  9. Weingart, S. D., & Levitan, R. M. (2012). Preoxygenation and prevention of desaturation during emergency airway management. Annals of Emergency Medicine, 59(3), 165–175. https://doi.org/10.1016/j.annemergmed.2011.10.002
  • Preparation: Equipment check, team brief, backup plans ready before induction
  • Positioning: Ramped positioning (ear-to-sternal-notch) and optimal preoxygenation
  • Plan: Always have Plan A (intubation), Plan B (SGA), and Plan C (surgical airway) before the first attempt

"Failing to plan is planning to fail" is never more true than in emergency airway management.

Back to Procedures Education Home